
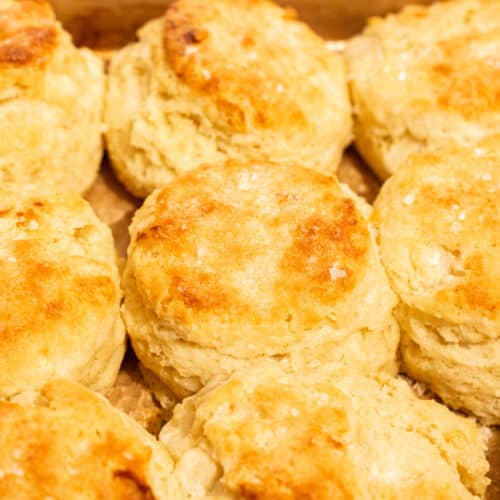
Flaky Buttermilk Biscuits Recipe (Tall, Buttery & Layered!)
These flaky buttermilk biscuits are incredibly soft, buttery, tall, and way easier to make than you’d think. There’s just something magical about pulling apart a warm biscuit and watching golden, buttery layers separate like pages in a book.
If you’re anything like me, you grew up on canned biscuits or those dry Popeyes biscuits. My mom was always intimidated by homemade biscuits, and I totally get it. They seem like something only experienced bakers can pull off. That’s exactly why I created this easy buttermilk biscuit recipe that anyone can master, no matter your skill level.
The secret? Just two simple techniques: grating butter (takes 2 minutes) and a basic lamination method that’s really just folding dough four times. With these tricks and 7 pantry ingredients, you’ll have bakery-quality flaky biscuits at home. Don’t forget to slather them with strawberry jam or extra butter; trust me on this.

Why You’ll Love This Biscuit Recipe
Look, I’ve tried a LOT of biscuit recipes. Some were too dry, others didn’t rise, and plenty turned out dense instead of flaky. After way too many failed batches (and a few tears), I finally figured out what actually works. The perfect recipe.
Here’s what makes these biscuits special:
- They’re genuinely easy – No fancy equipment, no complicated steps. If you can grate cheese, you can make these biscuits. They are genuinely one of my favorite things to bake!
- They actually rise tall – We’re talking 2-3 inches tall. None of those sad, flat hockey pucks.
- The layers are REAL – You can literally see and pull apart distinct buttery layers. It’s so satisfying.
- They taste like butter, not baking powder – The right ratios give you buttery flavor without that metallic chemical taste some biscuits have.
- They’re versatile – Breakfast, dinner, dessert, these biscuits fit anywhere. I’ve served them with fried chicken, used them for strawberry shortcake, and eaten them straight with butter at 10 PM. No regrets.
Watch How To Make Flaky Buttermilk Biscuit Video Tutorial
These Two Biscuit Secrets Change Everything
Okay, calling them secrets is dramatic; these are just techniques that make a massive difference but sound scarier than they actually are.
Secret #1: Grated Butter
Most recipes tell you to “cut butter into flour until it looks like coarse crumbs.” That’s fine, but if you want those dramatic layers that pull apart? You need a better method.
Here’s what I do: Grate all the butter on a box grater (the same one you use for cheese). By running cold butter across the grater, you create thin, even shreds that distribute perfectly throughout the dough. These tiny butter pieces create countless steam pockets when they hit the hot oven, dramatically pushing the layers apart.
The result? Biscuits that rise tall and pull apart in satisfying, buttery sheets. It takes about 2 minutes and makes all the difference. You know I’m a certified lazy baker, but this step is actually worth it, trust me.
Secret #2: Lamination (It’s Just Folding, I Promise)
“Lamination” sounds like something from a French bakery, but it’s literally just folding the dough four to five times. That’s it. No rolling pin necessary.
Each fold doubles your layers:
- 1 fold = 2 layers
- 2 folds = 4 layers
- 4 folds = 16 layers
When those 16 layers hit the hot oven, the butter melts, creating steam that pushes the layers apart. Science is pretty cool!
I was scared to try this the first time because I thought I’d mess it up. Turns out, it’s basically impossible to mess up folding dough. If I can do it half-asleep on a Sunday morning, you can definitely do it.

What You’ll Need for Buttermilk Biscuits
Before we dive into the how-to, let’s talk about why each ingredient matters. Understanding the “why” behind what you’re using makes you a better baker (and helps you troubleshoot if something goes wrong). Don’t worry about amounts right now, the full recipe card with exact measurements is at the bottom of this post.
The Ingredients
- All-purpose flour – This provides the structure for the biscuits. Regular pantry all-purpose flour works perfectly here. Avoid bread flour (too much protein, which makes biscuits tough) and cake flour (not enough structure). If you have White Lily flour, feel free to use it, but it’s not required for great results.
- Baking powder – This is your main lift. Make sure it’s fresh! I’ll show you how to test it below.
- Baking soda – Works with the buttermilk’s acidity for extra rise AND better browning. It’s the secret to those golden tops.
- Salt – Balances all the flavors and makes the butter taste even more buttery. Don’t skip it.
- Sugar – Just a touch for flavor balance and browning. These aren’t sweet biscuits, but a little sugar goes a long way.
- Cold salted butter – This is where the magic happens. The butter creates those flaky layers. Keep it in the freezer until you’re ready to use it.
- Cold buttermilk – Three reasons this matters: adds moisture, provides acidity that reacts with the baking soda, and tenderizes the dough. This is what makes these “buttermilk biscuits” instead of regular biscuits.
- Melted butter for finishing – Trust me, brushing butter on top right after baking is non-negotiable. It adds flavor and that beautiful shine.
“I don’t have buttermilk!”
You can make a quick substitute by stirring 1 tablespoon lemon juice or white vinegar into 1 cup of whole milk. Let it sit for 5 minutes before using. While this isn’t quite the same as real buttermilk, it does work in a pinch. For the best flavor and texture, real buttermilk is still recommended (whole or reduced-fat both work). I always recommend having buttermilk on hand as it’s a key ingredient in so many recipes.
Have extra buttermilk? Try these recipes!
- Moist and Fluffy Vanilla Cake
- Moist Chocolate Cake
- Banana Cake with Cream Cheese Frosting
- Homemade Funfetti Cake
Equipment You Need
Nothing fancy, I promise:
- Box grater (the same one you use for cheese)
- Mixing bowl
- Biscuit cutter or drinking glass (2½-3 inches wide)
- Baking sheet
- Parchment paper
- Fork or wooden spoon (or anything, honestly)
- Bench Scraper
- Your hands (seriously, that’s the main tool)
Don’t have a biscuit cutter? Use a wide-mouth mason jar or the rim of a glass. Just make sure whatever you use has a sharp edge.
How to Make Flaky Buttermilk Biscuits (Step-by-Step)
Step 1: Get Everything COLD
This is the most important step, and I’m dead serious. Put your butter in the freezer for 15 minutes before you start. Put your buttermilk in the fridge. If your kitchen is warm, even stick the mixing bowl in the fridge.
Why? Cold butter = flaky layers. Soft butter = dense biscuits. It’s that simple.
Preheat your oven to 450°F while everything chills. Line a baking sheet with parchment paper.
Step 2: Mix the Dry Ingredients
In a large bowl, whisk together the flour, baking powder, baking soda, salt, and sugar.

Step 3: The Butter Magic
Take your freezer-cold butter and grate all 10 tablespoons using the large holes on your box grater. The butter should come out in thin, cold shreds. If it starts getting soft and clumpy, stick it back in the freezer for 5 minutes.
Add the grated butter to your flour mixture. Toss it gently with your hands until the butter pieces are evenly coated in flour.


Step 4: Add the Buttermilk
Pour in your cold buttermilk. Using a fork or your hand, stir just until the dough barely comes together. It’ll look rough and dry in spots; that’s exactly right. Don’t overmix! The more you stir, the tougher your biscuits will be.


Step 5: The Lamination (AKA Folding)
Turn your messy dough out onto a lightly floured surface. It’s going to look like a disaster. That’s normal.
- Pat it into a rough rectangle (doesn’t have to be pretty)
- Fold it in half like a book
- Turn it 90 degrees
- Pat it back into a rectangle
- Repeat 4 times total
That’s it. You’re not kneading it, just gently folding. Use a light touch, pretend you’re handling something delicate.


Step 6: Cut the Biscuits
Dip your biscuit cutter in flour and press straight down through the dough. DO NOT TWIST the cutter. Twisting the cutter seals the edges, and your biscuits won’t rise properly.
Arrange them on your baking sheet so they’re touching or almost touching. Place in the freezer for 15-20 minutes to get the butter firm again. The colder the better.


Step 7: Bake
Brush the cold biscuits with heavy cream and place them in the 450°F oven for 5 minutes. Then, without opening the oven, reduce the temperature to 425°F and bake for another 10-12 minutes. Brush with melted butter and serve.

Tips for Perfect Flaky Buttermilk Biscuits Every Time
1. Keep Everything Cold
I can’t stress this enough. Room temperature butter = sad, dense biscuits. If at ANY point during the process your butter feels soft, stick everything in the freezer for 5 minutes.
Signs your butter is too warm:
- It’s sticking to the grater
- The butter pieces are clumping together
- It feels soft when you touch it
2. Don’t Overwork the Biscuit Dough
Every time you mix, fold, or touch the dough, you develop gluten. Gluten makes bread chewy, which is great for bread. But for biscuits? It makes them tough and dense.
Biscuit dough should look rough, shaggy, and just barely hold together. This isn’t bread dough like cinnamon rolls, where you want the dough smooth and elastic. Those qualities mean the biscuit dough has been overworked.
3. The Straight-Down Cut is Everything
I twisted my biscuit cutter for YEARS before learning this ruins them. Twisting seals the edges of the layers so they can’t separate and rise. Think of it like using a cookie cutter, one firm press straight down, then pull straight up.
4. Drop the Rolling Pin
When making flaky buttermilk biscuits, a light hand is key, and a rolling pin is unnecessary. Rolling pins often encourage dough to be rolled too thin, when biscuits should be kept thick for the best rise. Instead, just like grandma did, use your hands to gently pat the dough into shape.
How to Flavor Buttermilk Biscuits
Once you’ve mastered the basic recipe, you can get really creative with flavors. Here are some fun variations:
- Cheddar Jalapeño Biscuits: Add 1 cup shredded sharp cheddar and 2 tablespoons diced pickled jalapeños to the dry ingredients. Perfect with chili or soup.
- Sweet Shortcake Biscuits: Increase sugar to 1/4 cup and add 1 teaspoon vanilla extract. Use these for strawberry shortcake, they’re insane.
- Garlic Herb Biscuits: Add 1 teaspoon garlic powder and 2 tablespoons chopped fresh herbs (rosemary, thyme, or chives) to the dry ingredients. Brush with garlic butter after baking.
- Everything Bagel Biscuits: Brush tops with melted butter before baking, then sprinkle with everything bagel seasoning. Serve with cream cheese for breakfast.

How to Store Homemade Buttermilk Biscuits
Storing Fresh Biscuits
Keep them in an airtight container or zip-lock bag at room temperature for up to 2 days. Don’t refrigerate, they’ll dry out. Honestly, though, they’re best eaten the day you make them, still slightly warm from the oven.
Freezing Baked Buttermilk Biscuits
Let them cool completely, then freeze in a freezer bag for up to 3 months. Reheat from frozen at 350°F for 10-12 minutes or until warm through.
Freezing Unbaked Buttermilk Biscuits (My Favorite Trick!)
Cut the biscuits, place them on a parchment-lined baking sheet, and freeze until solid (about 2 hours). Transfer to a freezer bag.
When you want fresh biscuits, bake them straight from frozen. Just add 3-5 minutes to the baking time. This means you can have fresh biscuits on a random Tuesday morning without any effort.
Frequently Asked Questions on Buttermilk Biscuits
You can make a buttermilk substitute with 1 tablespoon lemon juice or white vinegar + enough whole milk to make 1 cup. Let it sit for 5 minutes. It’s not quite the same, but it works.
Or, honestly, just buy buttermilk. You can freeze leftover buttermilk in ice cube trays for the next time.
Shortening makes tender biscuits because it coats flour proteins more effectively than butter does. But it has ZERO flavor. This recipe gets tenderness through technique (cold butter + gentle handling) while keeping all that buttery flavor.
Yes! Cut the biscuits, arrange on a baking sheet, cover tightly, and refrigerate for up to 24 hours or freeze for up to 3 months. Bake from the fridge (add 2 minutes) or freezer (add 5 minutes).
Absolutely! Just work in a larger bowl. The lamination is actually easier with a bigger piece of dough.

Get to Baking!
As you can see, these flaky buttermilk biscuits couldn’t be any easier! With just a few staple ingredients, you’ll have fresh biscuits coming out of the oven that your family will love.
It’s time to drop the premade canned biscuit dough and bake from scratch! Just remember: cold butter, gentle hands, and proper folds. That’s all you need for perfect biscuits every time.
Don’t forget to leave a review and tag me on social media @everythingjustbaked! I seriously love seeing your creations.
Ingredients
- 2½ cups (312g) all-purpose flour
- 1 tbsp baking powder
- ½ tsp baking soda
- ¾ tsp fine salt
- 1 tbsp granulated white sugar
- 1/2 cup + 2 tbsp (140g) salted butter super cold (I place in the freezer for 20 minutes)
- 1 cup (240ml) buttermilk cold
- 1-2 tbsp heavy cream for brushing before baking
- melted salted butter for brushing after baking
- flakey sea salt
Instructions
- Preheat oven to 450°F (232°C). Line a baking sheet with parchment paper.
- In a large bowl, whisk together the flour, baking powder, baking soda, salt, and sugar.
- Using the large holes of a box grater, grate the super cold butter and add to the dry ingredients. Toss gently until all butter pieces are coated in flour and evenly distributed.
- Pour in the cold buttermilk. Stir gently with a fork just until a shaggy dough forms. Do not overmix.
- Turn dough out onto a lightly floured surface. Pat into a rough rectangle.
- Fold the dough in thirds, rotate 90°, and repeat 3 more times, lightly flouring as needed. If at any point you are noticing your butter is getting soft, stop and place the dough in the freezer for 10-15 minutes.
- Pat dough to about 1-inch thickness. Use a sharp 2½–3-inch biscuit cutter to cut biscuits straight down (do not twist). Arrange biscuits close together on the prepared pan. Place in the freezer for 15-20 minutes or until they are super cold and firm. Remember cold butter is the secret for a flaky biscuit.
- Brush the cold biscuits with heavy cream. Bake at 450°F for 5 minutes, then reduce oven temperature to 425°F (218°C) and continue baking for 10–12 minutes, or until tall and deeply golden.
- Remove from oven and immediately brush the tops with melted butter and flaky sea salt. Cool for 5 minutes and serve with extra butter or jam. Enjoy!
Video
Notes
- Keep ingredients cold. Cold butter and cold dairy are essential for flaky biscuits. If the dough softens at any point, chill it briefly before continuing.
- Chill after cutting. For the flakiest layers, place the cut biscuits in the freezer for 10–15 minutes before baking to re-firm the butter.


Duuuude… Those were so much easier than i thought. I folded then twice instead of in half so while my layers were never ending, it only made like 6 and one little weirdough .. Still yummy though. I can’t wait to make those again!!! Had them with a big pan of chicken pot pie …oooh boy…
Finally! A fantastic buttermilk biscuit!
The BEST buttermilk biscuit recipe I’ve ever made !!!! Soft, fluffy, buttery without the metallic taste. Super easy and clear instructions.
Loved this recipe, was simple and the the only change I made was cut the biscuits square. My family loved them and we will be making them again.
Loved this recipe, was simple and the only change I made was cut the biscuits square. My family loved them and we will be making them again.
These. Were. So. Dang. Good. I’ve been making biscuits a long time but secretly these have been my favorite.
i have always wanted to make homemade biscuits and i did for the very first time my husband just loved them thank you
I enjoyed watching your happiness
I have never made a biscuit that tasted this good and had such beautiful lamination. Thank you, thank you, thank you!
I have been baking for years and have never been able to make such a high rise flaky biscuit until I made your recipe. WOW!!! They were so delicious!!! Thank you 😊
This was my 1st time making this and was absolutely delicious. I followed the recipe exactly and didn’t disappoint. It was easy to follow. My family also enjoyed it. Can’t wait to make another batch.
I made them and they were perfect!
My second try I got them right and they are soooooo good! Flaky and super delicious! I’ve tried other recipes and this is the only one I’ll be sticking too!!
My guy… when I tell you these biscuits came out soooo well! They were absolutely delicious! It was my first time making a homemade biscuit and there’s no turning back now. Thank you!
Super yummy and flaky!
I’ve have been scared to make cut biscuits forever. Whenever I did they came out flat like thick cookies! When I saw your recipe I decided to try again. I cannot tell you how many times I watched the video over and over again, before I finally made them and man was I pleased. I not scared to make biscuits any more! My wife who is incredibly picky ate four!
These were ABSOLUTELY DELICIOUS!
Thanks!!