
Soft Honey White Bread Recipe
This soft honey white bread is fluffy, tender, lightly sweet, and perfect for sandwiches, toast, grilled cheese, and honestly just eating warm with butter because we are not pretending we have self-control around fresh bread.
If you have ever wanted to make homemade white bread but felt like bread was too intimidating, this is the recipe to start with. It uses simple ingredients, does not require anything fancy, and can be kneaded by hand or made in a stand mixer. The honey gives the loaf a soft, cozy sweetness without making it taste like dessert, and the milk and butter help create that tender, fluffy texture we all want in a good sandwich bread.
Once you bake homemade white bread from scratch, it is going to be hard to go back to the store-bought version. And yes, this one is better than grandma’s. Don’t tell her I said that.

Why You’ll Love This Honey White Bread
This soft honey white bread is made for home bakers who want a reliable loaf without making the process harder than it needs to be.
- Soft and fluffy, but still sturdy enough for sandwiches
- Tender crumb with a light honey flavor
- Soft golden crust that bakes up beautifully
- Makes one full 9×5-inch loaf, perfect for everyday use
- Can be kneaded by hand or made in a stand mixer
The best part is that this recipe is beginner-friendly. You can knead it by hand or use a stand mixer, and you do not need to overthink every step. Bread can feel dramatic, but once you understand what the dough should look and feel like, it becomes so much easier.
Class is in session, and today we are making bread that is way better than anything sitting in a plastic bag at the store.
What Makes This Bread So Soft?
The secret to soft honey white bread is not just the ingredients. It is how the dough is handled.
The biggest thing is to keep the dough soft and slightly tacky. It should not be wet or impossible to work with, but it also should not feel dry or stiff. When too much flour is added, the bread loses that fluffy, tender texture and can bake up dense.
The short 10-minute rest before kneading also helps. It gives the flour time to absorb the liquid, which makes the dough easier to work with and helps you avoid adding too much extra flour.
A good second rise matters too. Letting the shaped loaf rise until it sits about 1 inch above the pan gives the bread that tall, soft sandwich loaf texture. Then, brushing the warm loaf with butter after baking helps soften the crust so you get a golden loaf that is tender from the inside out.
Ingredients You’ll Need
- Whole Milk: Milk makes this homemade white bread softer and more tender. I like to use whole milk because the extra fat helps create a more flavorful, tender loaf. Warm it to about 100°F to 110°F before mixing it with the yeast. If you don’t have a thermometer, it should feel warm like bath water, or like you would warm a bottle for a baby. It should not feel hot or uncomfortable to touch.
- Water: Hydrates the dough and keeps the texture light. Just like the milk, it should be warm, not hot.
- Instant Yeast: Instant yeast makes this bread easy and reliable. Even though instant yeast does not technically need to be activated first, I like letting it sit with the warm milk, water, and honey for a few minutes. It gives you peace of mind and lets you know the yeast is alive. You can also use active dry yeast; just the rise times may be longer.
- Honey: Honey gives this bread its signature flavor. It makes the loaf lightly sweet, but not too sweet. This is still an everyday sandwich bread, not a dessert bread.
- Butter: Softened butter adds richness and helps make the bread tender. Make sure it is softened so it mixes into the dough more easily.
- Salt: Salt is important for flavor. Without it, bread tastes flat. It also helps control the yeast and strengthen the dough.
- Bread Flour: Bread flour gives this honey white bread its soft, sturdy structure. It helps the loaf rise tall and slice nicely. You can use all-purpose flour if needed, but the loaf may be slightly softer and less tall.
How to Make Soft Honey White Bread
Step 1: Activate the yeast
In a large bowl, mix together the warm milk, warm water, honey, and yeast. Let it sit for 5 to 10 minutes, until the mixture looks slightly foamy or creamy on top. If this doesn’t happen, your yeast is dead, and you need to restart.
The milk and water should be warm, about 100°F to 110°F. If the liquid is too hot, it can kill the yeast. If you do not have a thermometer, it should feel warm like bath water.

Step 2: Mix the dough
Add the softened butter, salt, and 3 cups of bread flour. Mix with a wooden spoon or dough whisk until a shaggy dough forms.
At this point, the dough will look rough and a little sticky. That is normal. Do not panic and start dumping in flour.

Step 3: Let the dough rest
Cover the bowl and let the dough rest for 10 minutes.
This short rest gives the flour time to absorb the liquid, which makes the dough easier to knead by hand. It is a small step that makes a big difference, especially if you are new to bread making.
Step 4: Knead the dough
Turn the dough out onto a lightly floured surface and knead for 10 to 12 minutes. Add more flour only 1 tablespoon at a time as needed. The dough should become smooth, soft, elastic, and slightly tacky. It should not be wet or messy, but it also should not feel dry or stiff.
If you are using a stand mixer, knead the dough with the dough hook on medium-low speed for 6 to 8 minutes. The dough should pull away from the sides of the bowl but may still stick slightly to the bottom.

Step 5: Let the dough rise
Place the dough in a lightly greased bowl, cover it, and let it rise in a warm spot for 1 to 1 1/2 hours, or until doubled in size.
The exact time will depend on your kitchen’s temperature. A warmer kitchen will make the dough rise faster, while a cooler kitchen will slow it down.

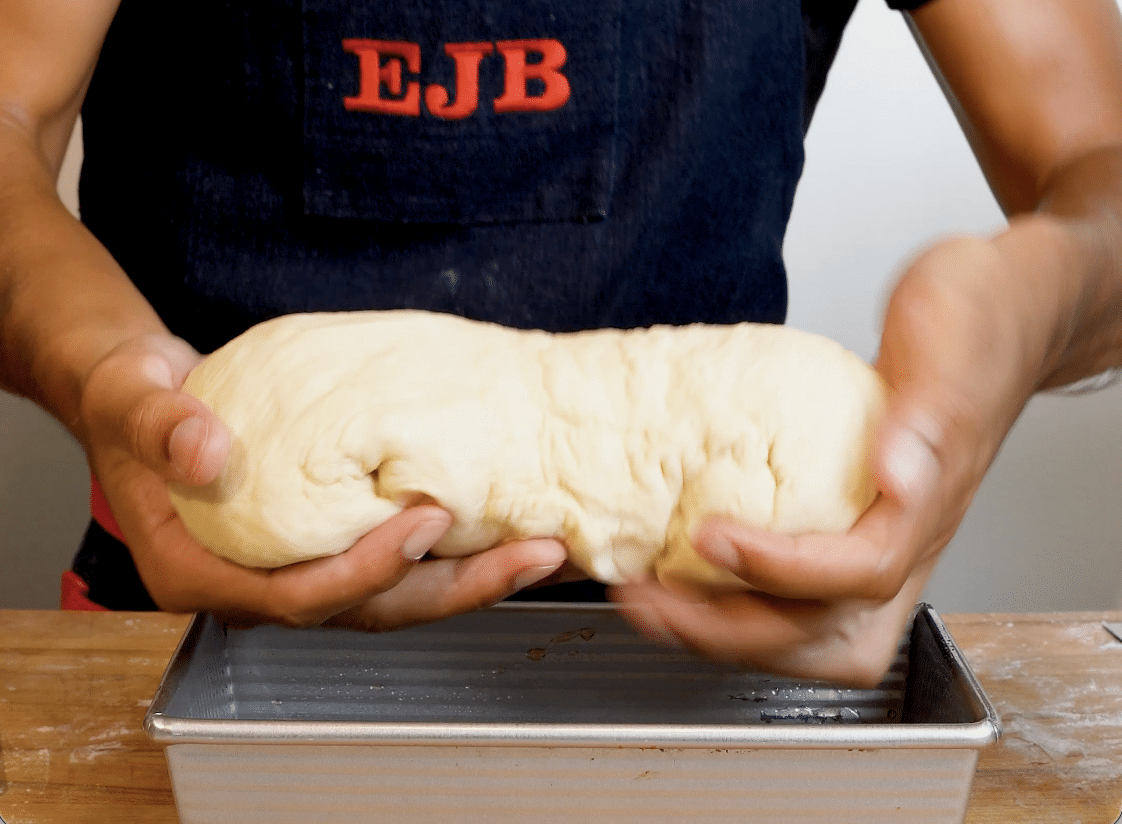
Step 6: Shape the loaf
Gently punch down the dough and place it on a lightly floured surface. Pat or roll it into a rectangle about 8×12 inches.
Starting from the short side, roll the dough up tightly into a log. Pinch the seam closed, then tuck the ends under slightly. Place the dough seam-side down in a greased 9×5-inch loaf pan. A tight roll helps the loaf rise evenly and gives you a prettier slice.
Step 7: Let it rise again
Cover the loaf and let it rise for 35 to 50 minutes, or until the dough rises about 1 inch above the rim of the pan.
Do not rush this step. The second rise is what gives the bread that tall, fluffy sandwich bread look.

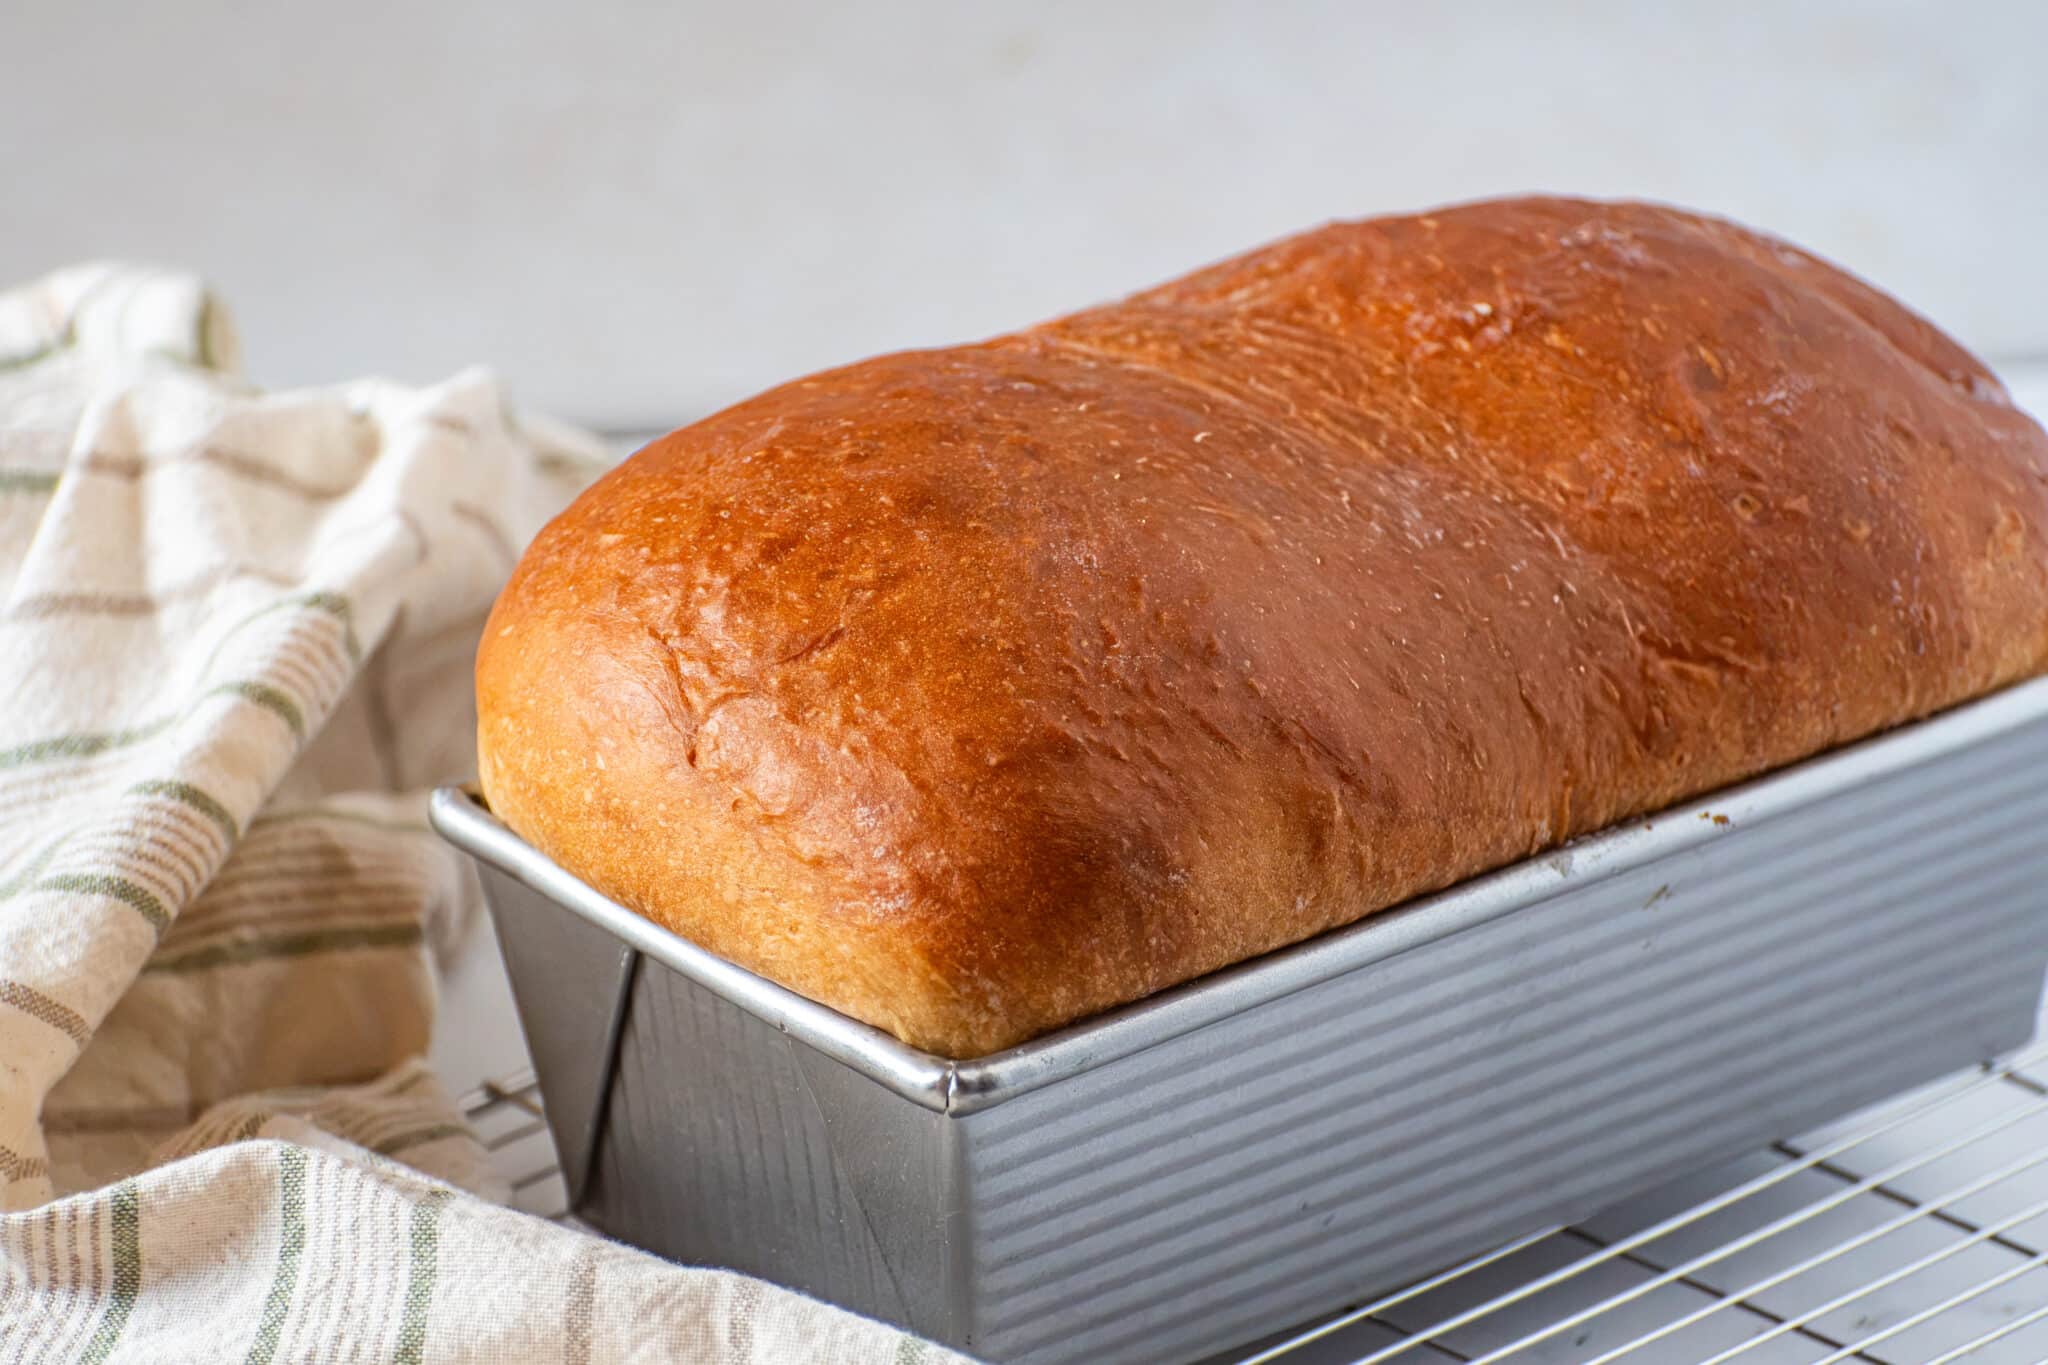
Step 8: Bake the honey white bread
Bake the bread at 350°F for 30 to 35 minutes, or until the top is golden brown and the center reaches 190°F to 195°F.
Step 9: Brush with butter and cool
Brush the warm loaf with melted butter right after baking. This will soften the bread and bring so much flavor. Let it cool in the pan for 10 minutes, then transfer it to a wire rack.
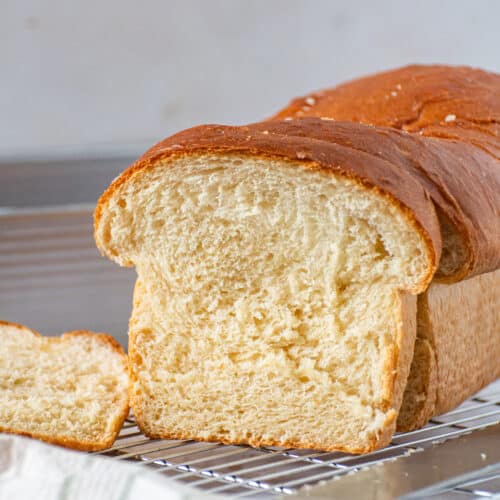
Let the bread cool completely before slicing. I know. The smell is rude, and the wait feels personal, but slicing hot bread can make the inside gummy.
Tips for the Best Homemade White Bread
- Do not add too much flour: This is the biggest mistake people make with homemade bread. The dough should be slightly tacky. If you keep adding flour until it feels completely dry, the baked bread will not be as soft.
- Use warm, not hot, liquid: Your milk and water should be about 100°F to 110°F. Hot liquid can kill the yeast, and then the dough will not rise properly.
- Let the dough rise until doubled: Go by how the dough looks, not just the clock. If your kitchen is cold, it may need more time.
- Shape the loaf tightly: Rolling the dough tightly helps create structure, height, and even slices.
- Cool before slicing: This is the hard part, but it matters. Bread continues to set as it cools. If you slice it too early, the crumb can turn gummy.
Can I Make This Honey White Bread Without a Stand Mixer?
Yes. This recipe was designed to be easy to knead by hand.
At first, the dough may feel sticky because of the honey and butter. Keep kneading and give it time. As the gluten develops, the dough will become smoother, softer, and easier to handle.
You can absolutely use a stand mixer if you have one, but you do not need one to make this soft honey white bread.

Can I Use All-Purpose Flour Instead of Bread Flour in Honey White Bread?
Yes, you can use all-purpose flour. The loaf may be slightly softer and a little less tall, but it will still be delicious.
Bread flour gives the bread more structure and helps it rise higher, which is why I prefer it for sandwich bread. For the best texture, use bread flour. If all-purpose flour is what you have, use it.
How Do I Know When the Dough Is Kneaded Enough?
The dough should look smooth and feel elastic. It should be soft and slightly tacky, but not wet.
A good test is to press the dough gently with your finger. If it springs back slowly, it is ready. If it tears easily or still looks rough, keep kneading for a few more minutes. Avoid adding more flour if it’s not needed.
How to Store Honey White Bread
Once the bread is completely cool, store it in an airtight bag or container at room temperature for up to 3 to 4 days.
Do not refrigerate it. The refrigerator can make homemade bread dry out faster.
For longer storage, freeze the loaf or individual slices for up to 2 months. I like freezing slices so I can pull out exactly what I need for toast or sandwiches.
What to Serve with Honey White Bread
This soft honey white bread is perfect for:
- Sandwiches
- Toast with butter and jam
- Grilled cheese
- French toast
- Peanut butter and jelly
- Breakfast sandwiches
- Egg salad
- Chicken salad
- Cinnamon sugar toast
Honestly, it is also perfect warm with butter. Sometimes simple is the whole point.
Frequently Asked Questions
Dense bread usually means the dough did not rise enough, too much flour was added, or the yeast was not active. Make sure your milk and water are warm, not hot, and let the dough rise until doubled.
A slightly sticky dough is normal. This dough has honey and butter, so it may feel tacky at first. Keep kneading before adding more flour. If it is truly wet and unmanageable, add flour 1 tablespoon at a time.
Yes. Use the same amount of active dry yeast and let it sit with the warm milk, warm water, and honey for 5 to 10 minutes before adding the remaining ingredients.
Cooling allows the crumb to set. If you slice the bread while it is too hot, the inside can become gummy or collapse.

Have Extra Yeast? Try These Recipes
Get to Baking!
This soft honey white bread is the kind of recipe that makes you feel like you really did something, even though the ingredients are simple. It is fluffy, tender, lightly sweet, and perfect for everyday sandwiches, toast, and grilled cheese.
Once you make homemade sandwich bread from scratch, it is very hard to go back to store-bought. The smell alone is enough to convince you.
So grab your flour, warm up that milk, and let’s make a loaf that is soft, golden, and absolutely worth the rise time. And don’t forget to leave a review and tag me on social media @everythingjustbaked! I love seeing what you create!

Ingredients
- 2/3 cup whole milk warm, about 100°F to 110°F
- 1/2 cup water warm, about 100°F to 110°F
- 2 1/4 teaspoons instant or active dry yeast
- 3 tablespoons honey
- 1/4 cup salted butter softened
- 1 teaspoon salt
- 3 to 3 1/4 cups bread flour
- 2 tbsp salted butter for brushing
Instructions
- In a large bowl, mix together the warm milk, warm water, honey, and yeast. Let it sit for 5 to 10 minutes, until the mixture looks slightly foamy or creamy on top. This means your yeast is alive. If it does not foam, your yeast is dead, and you must restart.
- Add the softened butter, salt, and 3 cups of bread flour. Mix with a wooden spoon or dough whisk until a shaggy dough forms. The dough will look rough and slightly sticky at first.
- Loosely cover the bowl and let the dough rest for 10 minutes. This gives the flour time to absorb the liquid and makes the dough easier to knead by hand. If you're using a stand mixer to knead, skip this step and knead on medium-low speed for 6 to 8 minutes, adding more flour only 1 tablespoon at a time as needed.
- Turn the dough onto a lightly floured surface. Knead for 10 to 12 minutes, adding more flour only 1 tablespoon at a time as needed. Avoid adding too much flour, which will cause a less fluffy bread.
- To knead, push the dough away from you with the heel of your hand, fold it back over itself, rotate, and repeat. The dough is ready when it is smooth, soft, elastic, and slightly tacky, but not wet. It should slowly spring back when pressed.
- Place the dough in a lightly greased bowl. Cover and let it rise in a warm spot for 1 to 1 1/2 hours, or until doubled in size.
- Gently place the dough on a lightly floured surface. Pat or roll it into a rectangle about 8×12 inches.
- Starting from the short side, roll the dough up tightly into a log. Pinch the seam closed, then tuck the ends under slightly.
- Place the dough seam-side down in a greased 9×5-inch loaf pan.
- Cover and let rise for 35 to 50 minutes, or until the dough rises about 1 inch above the rim of the pan.
- Preheat the oven to 350°F. Bake for 30 to 35 minutes, or until the loaf is golden brown and the center reaches 190°F to 195°F.
- Brush the warm loaf with melted butter right after baking. Let it cool in the pan for 10 minutes, then transfer to a wire rack. Cool completely before slicing. Cutting while the bread is hot can cause a gummy texture.
Notes
- Bread flour gives the loaf more structure, height, and a soft, chewy texture. All-purpose flour can be used, but the loaf may be slightly softer and a little less tall.
- Do not slice the bread while it is hot. Letting it cool completely helps the crumb set, so the slices are soft, clean, and not gummy.
- Store cooled bread in an airtight bag or container at room temperature for up to 3 days.
- To freeze, wrap the cooled loaf or individual slices tightly and freeze for up to 2 months. Thaw at room temperature or toast slices straight from frozen.


Yes!!!
Can this recipe be doubled or tripled?
I recommend making separate batches for best results. You can double though, I would avoid tripling batch.
Can I make honey wheat bread with this recipe too?
I wouldn’t recommend it with this recipe. Whole wheat flour behaves differently, Ill work on a recipe for that.