
Homemade Banana Pudding (Classic Recipe from Scratch)
If you grew up in a house where homemade banana pudding made regular appearances at family gatherings, then you already know: this dessert is more than just pudding. It’s comfort in a bowl. It’s tradition. And in my family, it’s a non-negotiable at any barbecue, summer cookout, or soul food Sunday.
Looking for more Banana Desserts? Try our Banana Cake with Cream Cheese Frosting or Chocolate Chip Banana Bread.

This homemade banana pudding recipe is everything you love about the Southern classic—but made completely from scratch. No boxed pudding mix, no shortcuts. Just silky, vanilla-infused custard layered with ripe bananas, Nilla wafers, and fluffy whipped cream. It’s rich, nostalgic, and so much better than anything store-bought. Whether you’re feeding a crowd or just craving something cozy and familiar, this banana pudding will become a staple in your home, too.
Try our Banana Pudding Ice Cream Recipe! Yes, you read that right!
Banana Pudding Video Tutorial
Why You’ll Love This Recipe
- Made 100% from scratch with real custard (no boxed pudding!)
- Perfect balance of sweet, creamy, and nostalgic
- Ideal for barbecues, holidays, birthdays, or just because
- Make-ahead friendly—in fact, it’s better the next day
- A classic crowd-pleaser that always disappears fast

Skip the Box Mix & Cool Whip
Let’s be real—there’s nothing wrong with a quick banana pudding shortcut. But if you’ve only ever had the boxed pudding + Cool Whip version, you’re about to experience the real thing. This version trades artificial ingredients for real egg yolks, milk, cream, and homemade whipped cream—ingredients that deliver deeper flavor and better texture. It’s the kind of upgrade you can actually taste.
Once you try this homemade banana pudding, you won’t go back. And don’t worry, it’s just as easy and comes together quickly!
Ingredients You’ll Need
For the Custard:
- Whole milk – Creates a smooth, creamy base for the custard.
- Heavy cream – Adds richness and a luxurious mouthfeel.
- Granulated sugar – Sweetens the custard just enough without overpowering the banana flavor.
- Cornstarch – Thickens the custard and gives it that classic pudding texture.
- Salt – Balances the sweetness and enhances flavor.
- Egg yolks – Give the custard structure and a rich, velvety finish.
- Butter – Adds silkiness and flavor once the custard is cooked.
- Vanilla bean paste or extract – Infuses the pudding with warm vanilla flavor.
- Sweetened condensed milk – Optional, but adds nostalgic sweetness and a boxed pudding-like richness. (optional, but highly recommended for that boxed pudding vibe!)
For the Whipped Cream:
- Heavy cream – Whips up into soft peaks for a fluffy, stable base.
- Powdered sugar – Adds sweetness and helps stabilize the whipped cream.
- Vanilla extract – Infuses a light, aromatic flavor that balances the custard.
For Layering:
- Nilla wafers – Provide soft, cake-like texture as they absorb moisture and flavor.
- Ripe bananas – Add natural sweetness and iconic banana flavor to every bite.
Tools You’ll Need
To make this banana pudding recipe smooth and stress-free, here are the kitchen tools I recommend:
- Medium saucepan – for cooking the custard
- Whisk – essential for a lump-free custard
- Fine-mesh strainer – for that ultra-smooth texture
- Mixing bowls – to chill your custard and whip the cream
- Hand or stand mixer – to whip cream to fluffy perfection
- Rubber spatula – great for folding without deflating the whipped cream
- Trifle dish or 9×13 baking dish – perfect for layering and presentation
- Individual jars or cups – ideal for parties and portioned desserts
Having the right tools not only makes prep easier—it also gives you that picture-perfect finish.

What Makes This Banana Pudding Different?
This isn’t just banana pudding—it’s an elevated version of the classic. What sets it apart is the real pastry custard, made from scratch with egg yolks, sugar, and cornstarch, slowly thickened on the stove. Unlike the boxed mix, this custard is velvety, rich, and customizable to your exact taste.
And instead of frozen whipped topping, we use freshly whipped cream, folded into the custard to give it that signature fluffy, Magnolia-style texture—only better.
Here’s a quick breakdown:
- Boxed pudding: overly sweet, thin texture, artificial flavor
- This recipe: deep vanilla flavor, creamy custard, real whipped cream
Once you taste the difference, it’s hard to go back.
If you love from-scratch desserts like this, you might also enjoy my vanilla cake recipe or this fudgy brownie recipe.
And if you’re a little bit of a food history nerd (like me), you can learn where banana pudding came from and how it became a Southern staple here. Let’s just say—I’m so glad someone thought to put bananas, cookies, and custard together.
Step-by-Step: How to Make Homemade Banana Pudding
1. Make the Custard
- Whisk sugar, cornstarch, and salt.
- Add egg yolks, milk, and cream.
- Cook over medium heat until thickened.
- Remove from heat and stir in butter, vanilla, and sweetened condensed milk.
- Strain, cover, and chill.


2. Make the Whipped Cream
- Beat heavy cream, powdered sugar, and vanilla to medium-stiff peaks.

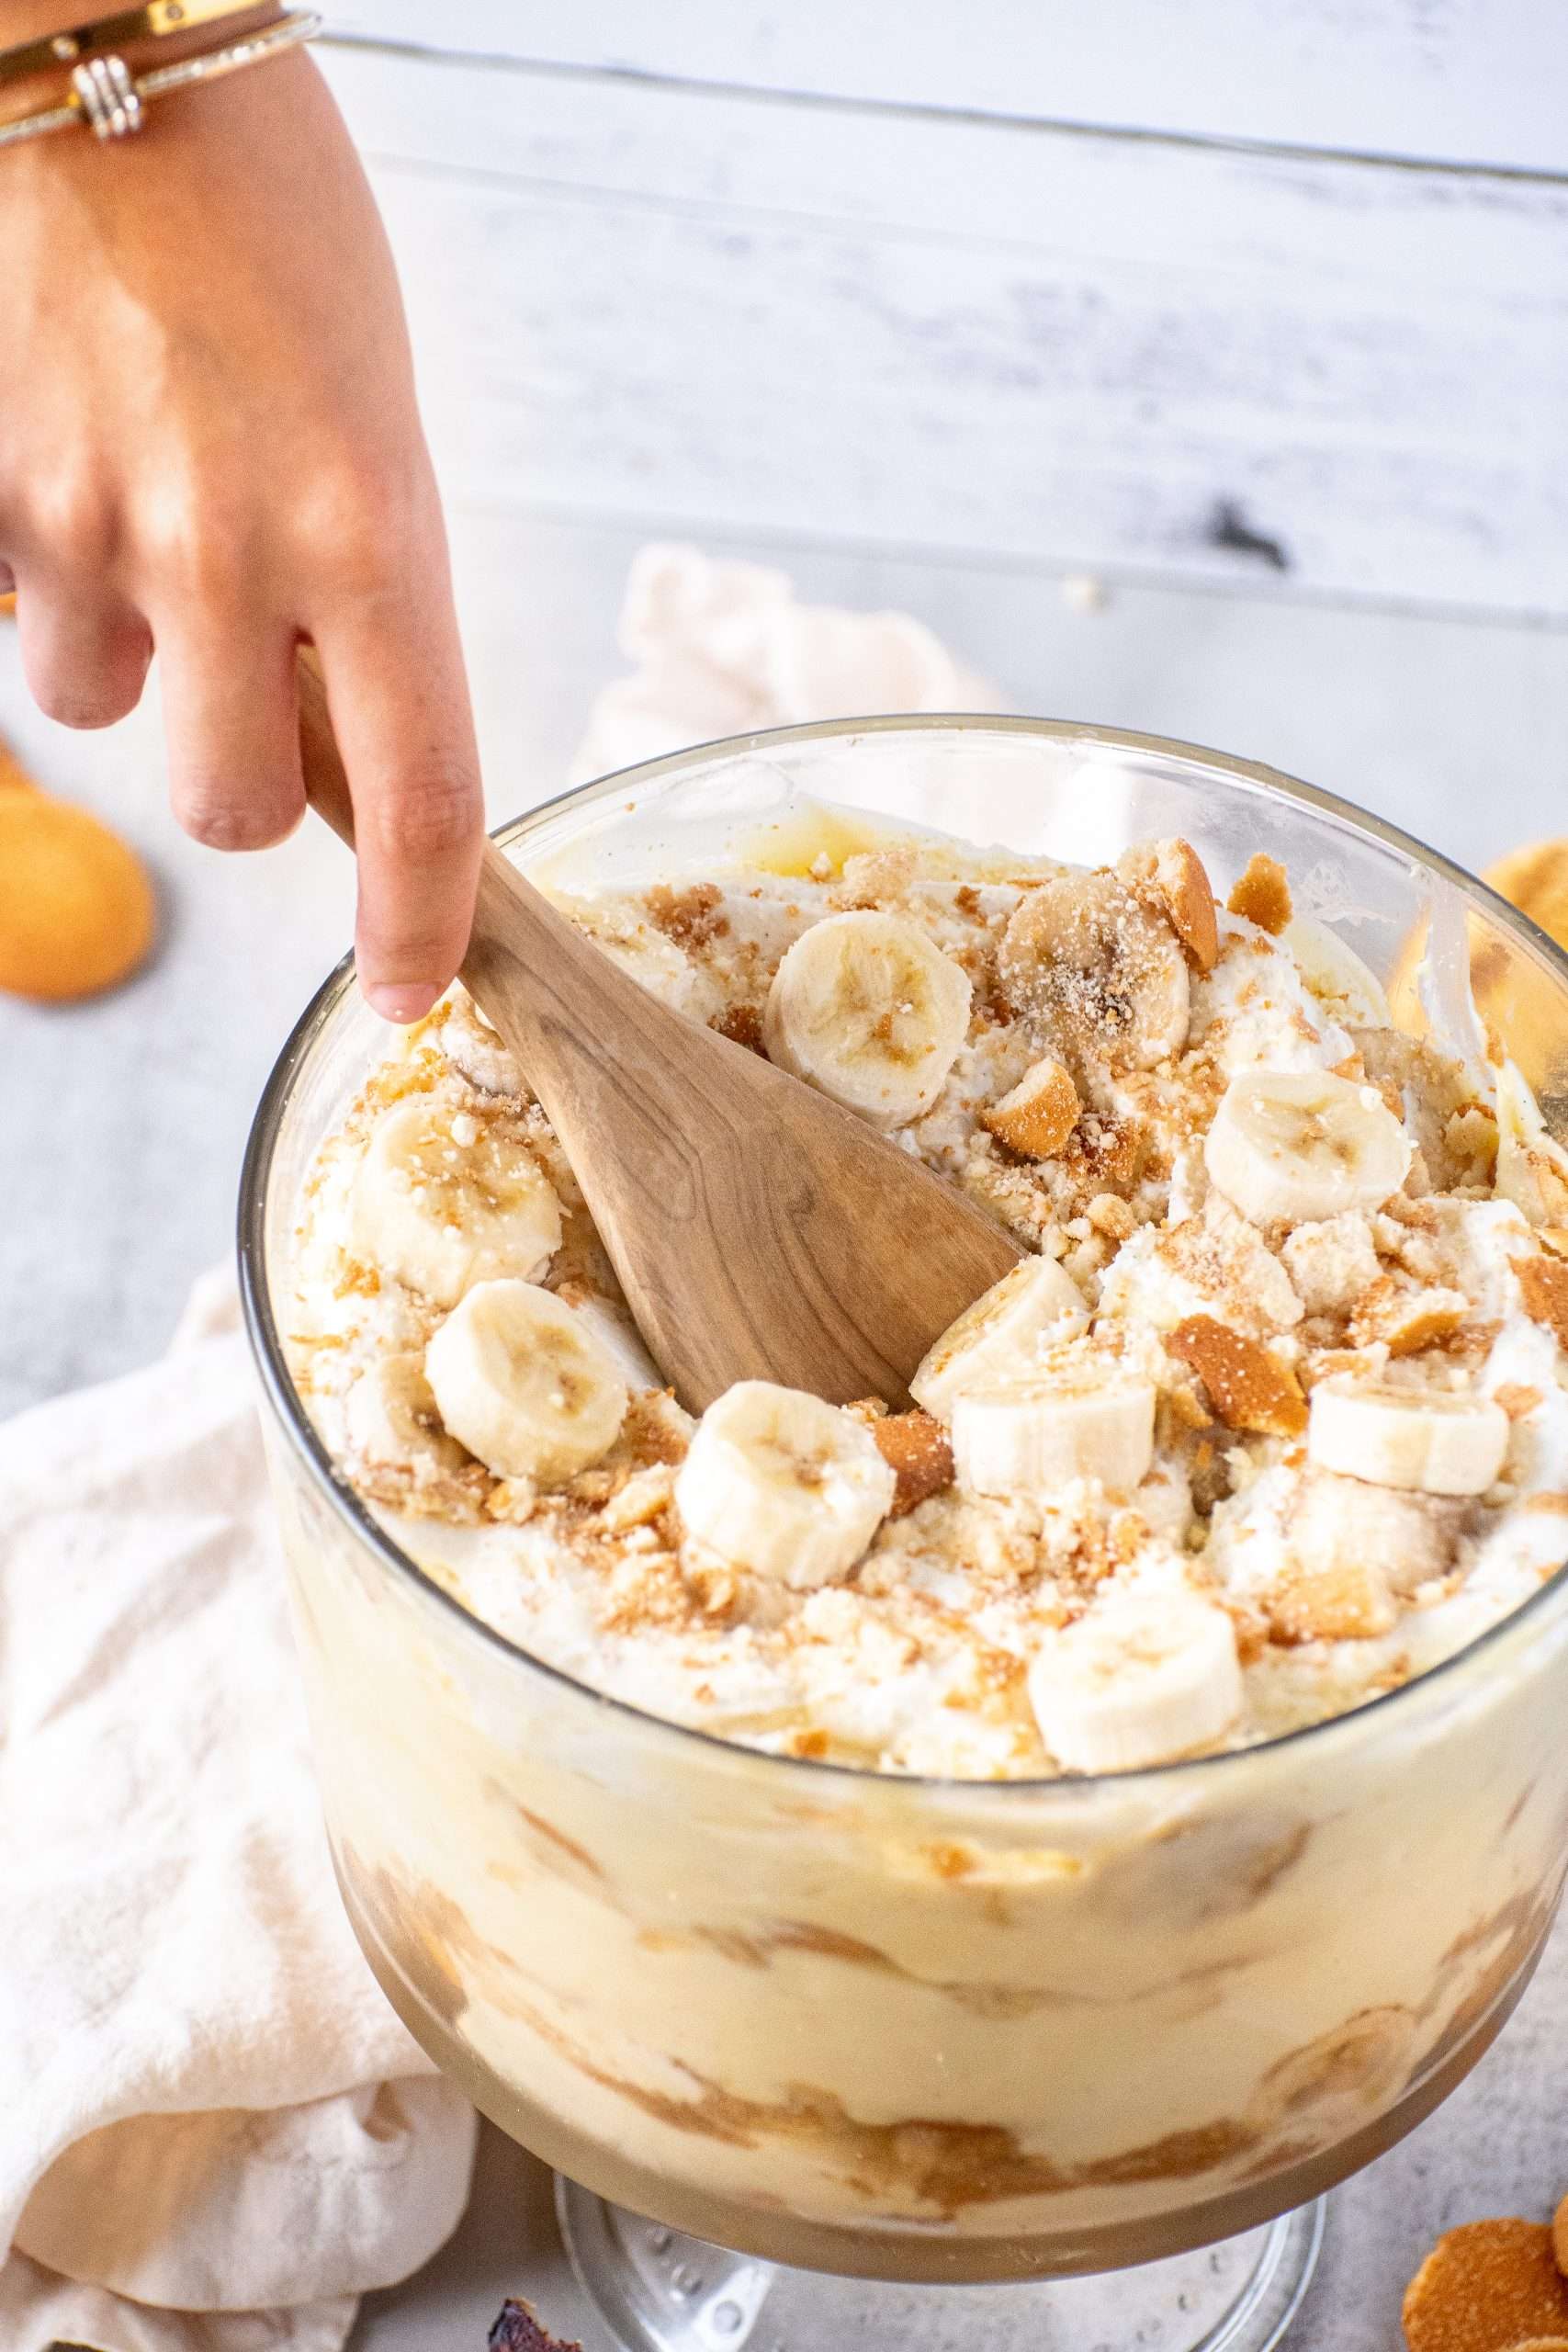
3. Fold & Layer
- Fold some of the whipped cream into the cooled custard.
- In a trifle dish or 9×13 pan, layer custard, Nilla wafers, and banana slices.
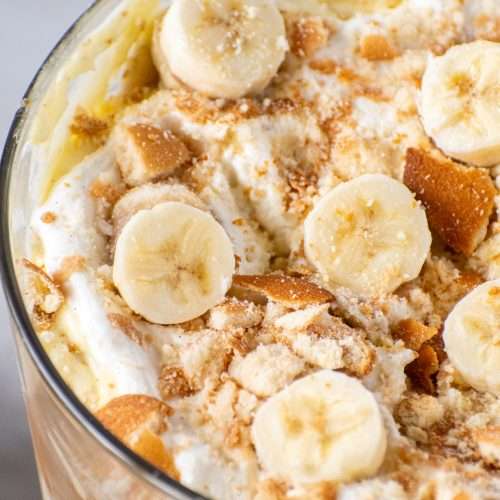
- Repeat the layers and finish with a generous topping of whipped cream.


4. Chill and Serve
- Refrigerate the homemade banana pudding for at least 4 hours, but overnight is best for softened cookies and maximum flavor.

How to Serve Homemade Banana Pudding
Banana pudding is incredibly versatile and can be served in a variety of fun, functional ways. If you’re feeding a crowd, a classic trifle dish makes for a beautiful centerpiece and allows the layers to really shine. You can even shop my favorite trifle dish here.
For parties, showers, or make-ahead meal prep, you can also layer the pudding in individual cups or jars. They’re easy to transport, super cute, and great for portion control. I love using these glass jars for picnics or BBQs—no scooping required!
Whether you’re keeping it casual or going for a wow factor, the presentation options are endless. Just make sure to chill it long enough for those Nilla wafers to soften and for all the flavors to come together.
Make-Ahead Tips
Homemade Banana Pudding is actually better when it sits overnight. The cookies soften, the flavors meld, and the whole thing becomes more scoopable and nostalgic.
If making more than a day ahead, wait to slice the bananas until you’re assembling to avoid browning.
How to Store Homemade Banana Pudding
- Fridge: Store tightly covered for up to 3 days.
- Freezer: Not recommended. The bananas and custard texture don’t hold up well once frozen and thawed.

FAQ
Can I use store-bought pudding instead? You can, but the real magic is in the homemade custard. It’s richer, smoother, and not overly sweet.
What kind of bananas should I use? Go for ripe, spotty bananas. They’re sweeter and have the perfect soft texture without being mushy.
Can I use another cookie besides Nilla Wafers? Yes! Butter cookies or shortbread work well, but Nilla Wafers are the classic.
Can I make banana pudding in individual cups or jars?
Absolutely! It’s perfect for portion control or entertaining. Just layer everything the same way in small jars or cups and chill as directed.
Why is my custard lumpy or curdled?
This can happen if the heat was too high or you didn’t stir constantly. Always cook custard over medium heat and strain it after cooking for that silky-smooth finish.
Why add sweetened condensed milk to the custard? It’s optional—but highly recommended if you want that creamy, nostalgic flavor that reminds you of boxed pudding (in the best way). Sweetened condensed milk adds an extra layer of richness and sweetness, giving the custard a slightly caramelized, milky finish that takes it to the next level. Just 1–2 tablespoons is all you need to make it shine.
Reader Favorite Variations
Want to put your own twist on it? Try:
- Caramel banana pudding – drizzle caramel sauce between layers
- Toasted coconut – for a tropical spin
- Peanut butter swirl – mix in a few dollops for a sweet-salty contrast
If you love banana pudding, wait until you try it as ice cream. This might be my new favorite flavor — and I don’t say that lightly. Try Banana Pudding Ice Cream here.
You Might Also Like
- Strawberry Cheesecake Cookies
- The Best Chocolate Chip Cookies with Brown Butter
- Bakery Style Blueberry Muffins
- Banana Cake with Cream Cheese Frosting
Try It at Your Next Barbecue
This homemade banana pudding is a guaranteed hit at any barbecue, family gathering, or potluck. It’s nostalgic, rich, and satisfying. The kind of dessert that has people asking, “Who made this?!”
For my family, it’s not just a recipe—it’s a memory. I hope it becomes one for you too.
Ingredients
- 2 ½ cups whole milk
- 1 cup heavy cream
- ¾ cup granulated sugar
- ¼ cup + 1 tbsp cornstarch
- ½ tsp salt
- 6 large egg yolks
- 2 tbsp salted butter unsalted works too
- 2 tbsp sweetened condensed milk
- 2 tsp vanilla bean paste or extract
- 2 cups heavy cream cold
- 3 tbsp powdered sugar adjust to taste
- 1 tsp vanilla extract
- ~70–80 Nilla Wafers almost a full 11 oz box
- 4-5 ripe bananas
Instructions
Make the Custard
- In a medium saucepan, whisk together sugar, cornstarch, and salt.
- In a separate bowl, whisk yolks with a splash of milk. Then whisk in remaining milk and cream.
- Combine the wet with the dry in the pan and cook over medium heat, stirring constantly, until thickened and gently bubbling (about 8–10 min).
- Cook 1 minute longer once it bubbles.
- Remove from heat and stir in butter, vanilla, and sweetened condensed milk.
- Strain the custard into a bowl and press plastic wrap directly on the surface. Chill for 30–60 min until cool.
Make the Whipped Cream
- Whip the heavy cream, powdered sugar, and vanilla until medium-stiff peaks form.
- Chill until ready to use.
Fold + Layer
- Fold ½ to ⅔ of the whipped cream into the cooled custard for that fluffy Magnolia-style texture.
- Save the rest for layering and topping.
- Assemble (in a trifle dish, 9×13 pan, or tall bowl)
- Repeat these layers 2–3 times:Thin layer of custardWhole Nilla wafers (about 20–25 per layer)Slices of Bananas More custardDollops of plain whipped cream between layers (optional but amazing)
- Top with final layer of whipped cream and crushed wafers.
- Chill at least 4 hours, but overnight is ideal for that soft cookie texture and deep banana flavor. Enjoy!
Video
Notes
- Make-Ahead: Banana pudding is best when chilled for at least 4 hours or overnight. This allows the Nilla wafers to soften and the flavors to fully develop.
- Bananas: Use ripe, spotty bananas for the best sweetness and texture. Slice right before assembling to prevent browning.
- Sweetened Condensed Milk: Optional, but adds a nostalgic boxed-pudding flavor. Start with 1–2 tablespoons and adjust to taste.
- Serving Tip: Serve in a trifle dish for a beautiful presentation, or in individual jars for easy portions at parties.
- Storage: Keep refrigerated for up to 3 days. Not freezer-friendly.


I made it turned out great!! I love the flavor
How would I add the condensed milk if I decide to add it? At what point?
At the end with the butter!
Absolutely loved this recipe! Made it for Father’s Day since banana pudding is my dad’s favorite—and wow, it was a total win. Three days later and he’s still talking about it! 😂 Super easy to follow, and I stuck to the recipe exactly. It turned out way better than any box mix I’ve used before. I felt like a total boss making it all from scratch! 💁🏽♀️ Can’t wait to try more of your recipes—this one’s definitely a keeper!
yayyy! This makes me so happy!!!!
Made this for my family and they all loved it! My 88 year old grandma who usually makes the banana pudding said it was great. Thank you for the great recipe and directions!!
Can I make the custard without the heavy cream?
Yes, it just wont be as rich! just replace with some milk.
This was my first home made banana pudding, so maybe take my comments with a grain of salt. The recipe was super easy to follow which I appreciate! I found the custard/pudding to be quite thick and a bit eggy. Making again I think I would lower the amount of cornstarch and egg yolks. It was so thick that it was hard to incorporate the whipped cream without it deflating. I used a 13×9 pan and needed to make more whipped cream to cover the top. Very yummy tho and my kids loved it.
For chocolate pudding can I just add cocoa powder to pudding?
Yes or melted chocolate! You may need to adjust sweetness levels if its bitter.
Can I use this vanilla custard recipe for cake filling? Thanks in advance
Totally!
This was a HIT ! Amazing in flavor and so easy to make. I will never buy boxed pudding for this again! I had the kids who normally don’t like it come back for seconds!
Amazing and super easy to make. My husband said Magnolia has some real competition!
Justin, PLEEEEEEEEEEAAAAASSSSEEEE come up with a better than grandma’s (AND Nabisco) recipe for vanilla wafers. When I was a kid in the 80s, the name brands actually tasted better, and we even had a regional company that made them with real vanilla (you know even if not paste, lol!) and they tasted so good. I read Nilla’s recipe was changed in 2020, and well, they taste like chemical vanilla cardboard. Hahaha! So whose website did I come straight to? YOURS! Because I already had your banana pudding recipe on file and knew you used packaged cookies, but I also know you awesomely interact with your followers and fans and thought, hmmm, just maybe…;-) 🤞🏻🙏🏼 P.S. SOOOOOO happy for your success and can’t wait for the book! 💜
Oh my! This recipe is so good! I made it for a party and doubled it so I’d have enough and I got 28 portions of 5 oz desert cups. Everybody loved it, I had none left as people took some home too. Lots of compliments and happy friends.
what can i do to keep the bananas from turning brown? thanks
You can try mixing them with some lemon juice. But its honestly inevitable. Just dont garnish until ready to serve
This is surprisingly good! I’ve never made pudding with cream before, so this was the first time I added it, but it had a nice flavor different from the usual! I did reduce the cream amount by half and replaced the rest with milk plus reduced the sugar by 15 grams (I made half the recipe in an 8×8 inch 2 layer banana pudding), since I’m trying to make it healthier for my mom. I would probably exclude the condensed milk next time, since I like the flavor of the pudding prior to adding it, but it’s not noticeable even with it when you mix it with the cream.
I also made my own wafer cookies to use. Definitely do crush and sprinkle the cookies on top, they give so much texture and are a nice contrast.
Easy and delicious. I plan to make custard from scratch for now on. Everyone loved it.
Delicious
My son made this for me for my birthday at my request. This is amazing!!! Best recipe I have tasted in a long time!!!! Thank you for this!!!!
The directions say to strain, but in the video, you don’t show that step. Is it necessary and how did you do it?
I didnt show it in the video just because of time limits. I recommend straining, just to result in a smoother pudding. Just take a fine mesh strainer and pour the pudding through it after its cooked.