
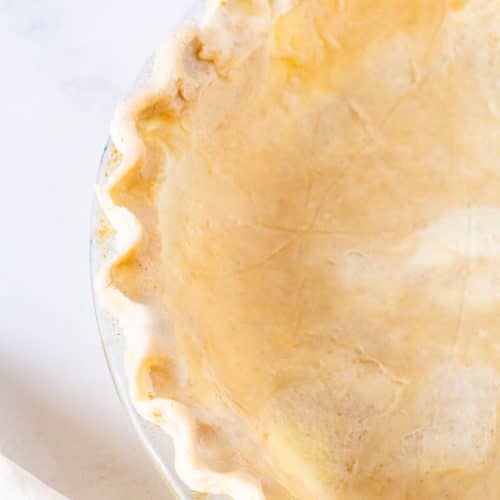
Best All Butter Flaky Pie Crust Recipe (Super Buttery & Easy!)
If you’ve ever struggled with pie crust, too tough, too crumbly, or just not flaky enough, you’re in the right place. After years of testing (and plenty of butter), I’ve finally perfected the all-butter flaky pie crust that never fails. It’s buttery, crisp, and tender with visible layers that shatter when you cut into it. The best part? It’s easier than you think.
My love for pie started in my grandma’s kitchen. Every holiday, I would sit around her counter, rolling dough, laughing, and stealing bites of filling when she wasn’t looking. She taught me early on that good pie crust comes down to two things: love and butter. She forbade shortening in her kitchen—“if you want real flavor,” she’d say, “you use butter.”
This recipe is my twist on hers. It keeps her buttery tradition alive but adds a few modern techniques I’ve learned along the way, like folding the dough for extra flakiness and using a touch of vanilla bean paste for that warm, bakery-style aroma. Now, every time I make it, it feels like a little piece of her holiday magic lives on in my kitchen.

In this post, I’ll walk you through everything I’ve learned about creating the perfect pie crust, from the science behind flakiness to my favorite folding technique that gives bakery-style layers. You’ll learn why butter beats shortening every time, how to keep your dough from shrinking, and exactly what to do if it feels too dry or sticky. By the end, you’ll be rolling out dough with confidence.
Looking for more holiday recipes? Try my Homemade Banana Pudding, Vanilla Pound Cake, or Homemade Apple Pie.
Watch How to Make the Best All Butter Flaky Pie Crust Recipe
What Is Pie Crust?
Before we dive into the details, let’s talk about what pie crust actually is. At its core, pie crust is a simple combination of flour, fat, and water that, when handled the right way, bakes into a tender, golden shell that holds everything from creamy custards to juicy fruit fillings.
Pie crust might seem basic, but it’s one of the most important (and technical) recipes in baking. The magic happens when cold butter meets flour and then hits the heat of the oven. The tiny bits of butter melt, releasing steam that lifts and separates layers of dough. That’s what creates those irresistible, flaky layers.
There are two main types of pie crust:
- Single crust: Just the bottom layer—perfect for pies like pumpkin or pecan.
- Double crust: A bottom and top layer, ideal for fruit pies like apple or cherry.
Some bakers use a mix of butter and shortening, or even lard, but I’ve always believed the best pie crusts start (and end) with butter. It gives you both structure and flavor, that rich, slightly salty taste that instantly takes you back to homemade comfort food.
So while the ingredient list might look short, the technique is what separates a good pie crust from a great one, and that’s exactly what I’m here to show you.

Why You’ll Love This All-Butter Flaky Pie Crust
- Rich, buttery flavor: There’s no substitute for real butter. It gives your crust that melt-in-your-mouth taste and golden color.
- Crisp yet tender texture: With the right balance of flour, fat, and liquid, this crust stays light and delicate—not dense or greasy.
- Beginner-friendly: No fancy tools required, just a bowl, pastry cutter (or your fingers), and some patience. We also add a touch of vinegar to make the dough extra forgiving and tender.
- Make-ahead friendly: The dough keeps beautifully in the fridge or freezer, so you can prep it days in advance.
The Science of a Flaky Pie Crust
So what makes a pie crust flaky instead of crumbly? It all comes down to fat and temperature.
When cold butter melts in the oven, it releases steam. Those steam pockets push apart layers of dough, creating the signature flake we all love. The trick is to keep the butter cold until it hits the oven; if it melts too early, it absorbs into the flour, and you lose the layers.
That’s why I chill everything: the butter, the flour, even the mixing bowl if my kitchen’s warm. Every little bit helps preserve those fat pockets.
Another key to flake is hydration control. Too much water activates gluten, making the crust tough. Too little, and it won’t hold together. The sweet spot? Just enough water for the dough to clump when pinched, but not enough to feel sticky.
Just look at that apple pie below. I know you see those flaky layers in the pie crust. YUM.

Why All Butter Beats Shortening Every Time in Flaky Pie Crust
People often ask if shortening makes a flakier crust. Here’s the truth: shortening might be a little easier to work with, but butter wins for both flavor and texture.
Butter:
- Melts in the mouth and browns beautifully.
- Adds unbeatable flavor: rich, slightly sweet, and aromatic.
- Creates flaky and crisp layers.
Shortening:
- Higher melting point, so it’s forgiving.
- Lacks flavor; can taste waxy or flat.
- Produces tenderness but less crispness.
After testing both, I always come back to butter. A pie crust should taste like something, and that something should be butter.
As my grandma always says, “nothing beats butter!” And honestly, she’s right. If the budget allows, this is one of those times to splurge on the “fancy” European-style butter. The higher fat content and lower water percentage give your crust a richer flavor and slightly more tender, flaky texture. I personally enjoy Kerry Gold Butter.
It’s definitely not necessary; this recipe works perfectly with regular salted butter (or unsalted butter), but if you’re baking for a holiday or special occasion, that premium butter adds just a little extra magic.
Ingredients You’ll Need for the Perfect Pie Crust
Here’s what goes into the best all-butter flaky pie crust, and why each ingredient matters:
- All-purpose flour: Provides structure and is the base of the crust.
- Granulated white sugar: Adds a hint of sweetness and helps the crust brown evenly.
- Salt: Balances flavor and enhances the butter.
- Salted butter: My secret weapon! I love the extra flavor. If you’re using unsalted, just bump the salt up to 1 teaspoon.
- Ice water: Hydrates the dough without melting the butter. Use it straight from the fridge.
- Vinegar: A tiny bit of acid weakens gluten, making the crust more tender and easier to roll. You won’t taste it.
- Vanilla bean paste or extract: This is my little twist; it adds a subtle aroma that makes the crust taste like it came from a high-end bakery.
Step-By-Step: How to Make the Perfect All-Butter Flaky Pie Crust
1. Chill Everything
Butter is the star of the show, and it needs to stay cold. Cube your butter, then pop it into the freezer for 10–15 minutes. If it’s summer or your kitchen runs warm, chill the flour, too.

2. Mix the Dry Ingredients
In a large bowl, whisk together the flour, sugar, and salt until evenly combined.

3. Cut in the Butter
Add your chilled butter cubes to the flour mixture. Using a pastry cutter, a fork or your fingertips, press and flatten the butter into the flour until you have a mix of pea-sized and a few larger chunks. Those bigger pieces are what create layers. You can also use a stand mixer with a paddle attachment, just pay attention to not overmix.


4. Add Liquid Gradually
Stir in the vinegar and vanilla bean paste, then drizzle in the ice water a tablespoon at a time. Toss gently with a fork or your hands until the dough just starts to clump together. It should look shaggy and hold when pinched, but not feel sticky.


5. Fold for Extra Flake
Turn the dough onto a floured surface and pat it into a rough rectangle. Roll it out slightly, then fold it into thirds—like folding a letter. Rotate it 90°, flatten slightly, and wrap tightly in plastic. This quick fold creates buttery layers that bake up beautifully flaky.

6. Chill the Pie Dough
Divide the dough into two disks. Refrigerate the wrapped dough for at least 2 hours, or up to 3 days. This step is crucial: it lets the gluten relax and the butter firm back up. Remember, cold dough is the secret to a flaky crust.
7. Roll and Assemble
Roll each disk out to ⅛–¼ inch thick. If it’s too firm, let it rest 10–20 minutes before rolling. Line your pie pan with one round, add your filling, and top with the second crust or a lattice. Trim and crimp the edges however you like. You can also make 2 pies without a top crust, like a Sweet Potato Pie, Dutch Apple, or a Pumpkin Pie.

9. Bake Until Golden
Bake according to your pie filling recipe. For blind baking (for cream or custard pies), line the crust with parchment, fill with pie weights, and bake at 375°F (190°C) for 15 minutes. Remove weights and bake another 10–15 minutes until golden.
Pro Tips for Successful Pie Crust Every Time
- Keep it cold. If the butter starts softening, chill your dough mid-process.
- Don’t overwork it. The more you handle the dough, the tougher it becomes. Gently mix.
- Let it rest. Chilling helps the flour hydrate evenly and prevents shrinkage.
- Bake from cold. Cold dough hitting a hot oven = instant steam = flake!
- Brush with egg wash (1 egg yolk beaten with 1 tablespoon water) for a glossy, golden finish.
Common Pie Crust Mistakes (and How to Fix Them)
1. The pie dough is too crumbly or dry
Add more water, one teaspoon at a time, just until it comes together. Remember, every kitchen’s humidity is different, so the exact amount can vary. Refer to the video tutorial if you’re struggling to determine the right consistency.
2. The dough is sticky or greasy
Too much water or overmixing can cause this. Sprinkle the dough with a bit more flour and chill before rolling.
3. The all-butter flaky pie crust shrinks while baking
This happens if the dough wasn’t chilled long enough or was stretched too much in the pan. Always chill before baking and avoid pressing the dough tightly into corners.
4. The pie crust isn’t flaky
This happens when the butter gets too warm before baking. Next time, chill longer before baking your pie. Remember COLD COLD COLD.
5. The pie crust bottom is soggy
Don’t feel bad, this is super common. Simply blind bake partially before adding wet fillings, or bake your pie on a lower rack to crisp the bottom.
How to Store and Freeze Pie Dough
In the fridge: Wrap the dough tightly in plastic wrap, then place in a ziploc and refrigerate up to 3 days.
In the freezer: Wrap the same way and Freeze for up to 2 months. Thaw overnight in the refrigerator before rolling.
After baking: Baked pie crust can be kept at room temperature (covered) for 2 days, or refrigerated for up to 5 days.
You can refrigerate/freeze the dough as a disk or already rolled in your pie dish. Just remember to wrap tightly in plastic wrap.

FAQs About All-Butter Flaky Pie Crust
Can I use unsalted butter?
Absolutely! Just increase the salt to 1 teaspoon total. I personally prefer salted butter for that extra flavor boost.
Can I make this crust in a food processor or a stand mixer?
Yes, I do this all the time! Just pulse the flour, salt, and sugar, then add butter and pulse until coarse crumbs form. Drizzle in water until it starts to clump. Be careful not to over-process, or the crust will lose flakiness.
Do I have to use vinegar?
No, but I highly recommend it. The acid keeps gluten in check, giving you a tender, crisp crust. Lemon juice works too.
How do I make all-butter flaky pie crust ahead of time?
Make the dough up to 3 days ahead or freeze it up to 2 months. Let it rest in the fridge overnight before rolling.
Can I use this for savory pies?
Definitely! Just skip the vanilla and reduce or omit the sugar.

Try our Pie Recipes!
Get to Baking the Best All Butter Flaky Pie Crust!
I’ve tested countless crusts over the years, and this one truly checks every box—flaky, flavorful, and foolproof. Once you get the hang of keeping everything cold and working gently, pie dough becomes second nature. This recipe is perfect for any pie on your list—apple, pecan, pumpkin, or even savory pot pies. Every baker needs a go-to crust, and this one’s mine.
Don’t forget to leave a review and tag me on social media @everythingjustbaked! I love seeing what you create!
Ingredients
- 2 ¾ cups all-purpose flour
- 1 tablespoon granulated sugar
- ½ teaspoon fine sea salt (use 1 teaspoon if using unsalted butter)
- 1 cup + 2 tbsp salted butter very cold and cubed
- 7-9 tbsp ice water
- 1 teaspoon apple cider vinegar or white vinegar
- 1 tsp vanilla bean paste or vanilla extract
Instructions
- Place the cubed butter in the freezer for 10–15 minutes. Keep the water cold in the fridge.
- In a large bowl, whisk together the flour, sugar, and salt.
- Add the cold butter to the flour mixture. Use a pastry cutter, fork, or your fingertips to work it in until you have pea- to nickel-sized chunks of butter throughout the dough.
- Mix in the vanilla bean paste and vinegar. Then slowly drizzle in the ice water, one tablespoon at a time, tossing gently until the dough just starts to come together. It should look shaggy and hold when pinched, but never feel wet or sticky.
- Turn the dough onto a lightly floured surface or parchment paper. Roll it into a rectangle, fold it in thirds like a letter, rotate 90 degrees, and flatten slightly. This quick fold adds beautiful flaky layers.
- Divide the dough into two disks. Wrap tightly in plastic wrap and refrigerate for at least 2 hours, or overnight for best flavor and texture.
- Roll each disk out to ⅛–¼ inch thick. If the dough feels too firm, let it rest at room temperature for 10–20 minutes to soften slightly before rolling. Line your pie pan with one round, fill as desired, and top with the second crust or a lattice. Chill again before baking to help the crust hold its shape and achieve flaky layers.
Video
Notes
- Keep everything cold! Cold butter and minimal handling are the keys to flaky layers. If the dough ever feels warm or sticky, pop it back in the fridge for 10–15 minutes.
- Salted vs. Unsalted Butter: This recipe was tested with salted butter for rich flavor. If using unsalted, increase salt to 1 teaspoon total.
- Storage: The dough can be refrigerated for up to 3 days or frozen (tightly wrapped) for up to 2 months. Thaw overnight in the fridge before using.
- Blind baking tip: For cream or custard pies, line the crust with parchment and fill with pie weights. Bake at 375°F (190°C) for 15 minutes, remove weights, and bake another 10–15 minutes until lightly golden.


This crust is AMAZING! I followed your steps clearly for a double crust apple pie. And will be using this recipe as my go to for pie crust.
Yayyyyyy! im so happy!
Easy to follow! Love the video! I left out sugar and vanilla (but I did make my own vanilla bean paste, following your recipe and OMG! Then added a tad bit more of salt to top my chicken pot pie. Way better than the Pepperidge Farm Puff Pastry!
Thank you!
Pie crust is something that has always intimidated me. It is something I am very scared of. Your video has given me confidence and I am going to attempt it this year. Send me good vibes please….or be my bestie and come over to show me it’s all in my head lol.
YOU GOT THIS!! I BELIEVE IN YOU!
How long to pre bake bottom pie crust before adding apple pie filling?
Temperature and how long?
Hi! I explain this in our apple pie recipe!! But in short, add the pie weights and bake at 425F for 15-20 minutes. Remove weights and continue baking for another 5-10 minutes. Hope that explains everything well. https://everythingjustbaked.com/homemade-apple-pie/
10/10 I tested 3 different crusts and yours was so easy to follow and the best tasting one by far! I’m in charge of dessert for thanksgiving and I just started to bake about 3 months ago. So easy to follow and ahhhmazing flavor! Wil absolutely be my go to.
So my Mom and grandma always added an egg to the water and vinegar (although, we also often use OJ instead of water). So you know what that egg might add?
The egg will make it more like a cookie! Still super delicious!
I only need 1 pie crust, is it ok to halve this recipe?
Totally! You can also freeze the other half for a future use.
Fantastic!! I’ve made a lot of pie crusts and tried many different recipes. I love the hack of rolling in waxed paper. I’ve always tried the fold and ease into the pie pan which can be disastrous. This crust stays crispy for DAYS. It’s been almost a week and still great!!!
I love your videos!!!! Im makingthis as we speak,its in the fridge chillin.. illkeep updated with the outcome
Justin!!!! I have tried for years to recreate my grandmothers crust and could not get it right. Your recipe is the one!!!! Thank you!!!!
Hi Justin. Do you have a recipe for cherry pie? Thanks. I LOVE your videos. Makes me want to bake!!
Oooh! Good idea! We will work on that recipe 🙂
I can’t wait to try this recipe! My grandma made the most amazing pie crusts with Fluffo. It’s no longer on the market and I just can’t find a recipe that makes an amazing crust like hers…fingers crossed this is the one!
Have you ever tried this with a 1:1 gf flour?
I havent, not too sure how it will work. But if you do test it, please let us know!
This butter pie crust is amazing!! So much better than shortening pie crust. My go to crust now!!!
Piecrust just freaks me out! I love your recipe, but the water is what gets me. I start with the minimal amount, but my crust doesn’t seem to hold together so I try to add more but I’m so scared. I’m gonna add too much and then every time I add a tablespoon and mix it I’m afraid I’m gonna overwork it. I live in Las Vegas where temperatures are hot and we really don’t have humidity. The last crust I don’t think I added enough water. It seemed flaky on the edges, but the bottom was just off. Any advice?
Dont be afraid to add more water Debbi! Environment plays a large role and sometimes you will need to use more water. As long as you still see butter chunks, it wont be overworked! And letting it rest will help prevent the crust from getting tough.